🩰 Introduction to the Poise Zone Matrix
❓ Why We Did This
In ballroom dance, particularly Standard and Smooth styles, stability and balance depend on where you place your weight — not just which foot, but where on that foot. Dancers speak vaguely of “poise,” “center,” or “being over the foot,” but there’s been little biomechanical clarity…
Until now.
We’ve analyzed the anatomy, torque dynamics, muscular support, and feedback channels of the human foot to define 18 unique zones.
Each zone was evaluated for:
- Muscle Support
- Torque Handling (Generation vs Resistance)
- Sensory Feedback
- Risk of Collapse
🧠 Why So Complex?
Because the foot is complex. Here are your poise zones.
 Simplified Poise Zones
 Power Line of the Foot
 Numbered Poise Segments
Numbered Poise segments of the Foot
Different segments serve different roles:
- Some zones launch.
- Some stabilize.
- Some warn of tipping.
- Others just scream in pain when misused.
A dancer standing flat-footed isn’t “centered” — they’re just ambiguous.
True poise comes from conscious use of the best biomechanical zones.
⭐ The Max Strength Line
During analysis, one line emerged repeatedly:
A chain of strongest, most supportive zones capable of:
- Opposing torque
- Absorbing weight
- Delivering feedback
We call this the Power Line or Max Strength Line:
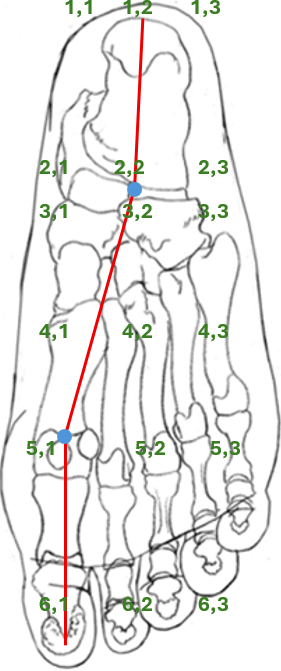
→ 6,1 → 5,1 → 3,2 → 2,2 → 1,2
This line curves from the medial forefoot across the arch toward the rear inner heel — the load-bearing heart of dance balance.
When your weight tracks along this path, you are:
- Stable
- Centered
- Capable of resistance and control
When you stray off it (e.g., 6,3 or 5,3)… things go wrong fast.
🦶 Final Verdict: The Poise Zone Matrix
| Column 1 | Column 2 | Column 3 | |
|---|---|---|---|
| **Row 1** | 🟢 | 🟢 | 🟡 |
| **Row 2** | 🟢 | 🟢 | 🟡 |
| **Row 3** | 🟢 | 🟡 | 🔴 |
| **Row 4** | 🟢 | 🟡 | 🔴 |
| **Row 5** | 🟢⭐ | 🟡 | 🔴 |
| **Row 6** | 🟢🌟 | 🟡 | 🔴 |
Legend:
- 🟢 = Strong and safe for poise
- 🟡 = Use with caution (transit or intention only)
- 🔴 = Collapse-prone, avoid for stability
- ⭐ = 5,1 — best ball-of-foot poise
- 🌟 = 6,1 — best forefoot poise (strongest zone overall)
Poise Zones by Front, Middle, and Back
While our 6×3 matrix describes 18 anatomical zones, dancers often perceive foot balance in three intuitive sections:
- Front Poise: Rows 1–2 (forefoot / ball of foot)
- Middle Poise: Rows 3–4 (arch / midfoot)
- Back Poise: Rows 5–6 (heel)
Each of these plays a distinct role in movement:
⚡ Front Poise (Rows 1–2)
- Used for: Rise, drive, rotation, acceleration, flicks, rebounds
- Feedback: High
- Muscle demand: High
- Stability: Excellent when aligned with Max Strength Line
- Warning: Unstable if combined with lateral drift (e.g., zones 1,3 or 2,3)
This is where dancers launch from. It’s dynamic and responsive — but must be used intentionally.
🔄 Middle Poise (Rows 3–4)
- Used for: Transition, soft landings, settling from rise or flight
- Feedback: Moderate
- Muscle demand: Balanced
- Stability: Strong along medial path (3,2 / 2,2), weaker laterally
This is your deceleration zone — a buffer between movement and grounding. Most dancers don’t stay here long, but pass through it cleanly during figures.
🪨 Back Poise (Rows 5–6)
- Used for: Anchoring, resistance, shaping, lunge prep, heel turns
- Feedback: Subtle but essential
- Muscle demand: Low, but precise
- Stability: Very strong along zones 5,1 and 6,1, extremely poor in lateral heel (6,3)
This is the foundation zone — the place where torque is either grounded or lost. Dancers feel the most “secure” here but risk becoming heavy, backward, or disconnected if overused.
🧠 Practical Teaching Summary
| Region | Primary Use | Risk if Misused |
|---|---|---|
| Front | Power, rise, initiation | Loss of balance if lateral |
| Middle | Transition, deceleration | Ambiguity, instability |
| Back | Anchoring, shape support | Heaviness, backward fall |
Train dancers to recognize where they are in this structure — not just which foot, but which region of the foot, and why.
🩰Takeaway
Dancers don’t need more rules — they need understanding.
The Poise Zone Matrix is a map, not a commandment.
We teach it because:
- Gravity doesn’t care about style.
- Torque doesn’t care about tradition.
- But you can learn how to work with both.
Use the map wisely.
Balance is not a position.
It’s a decision.